I made body creme today so I decided to try and take pictures during the process. It is hard to hold a camera in one hand and pour contents from one container to another with the other hand but I tried!
My body creme is made with pure vegetable oils and beeswax. I used grapefruit seed extract as a natural preservative. I have had many a conversation with those that think they must add a chemical preservative to lotion or body creme because it is made with water. Introducing water to the vegetable oils could then allow bacteria, yeast, and mold to grow without some type of preservative.
After perfecting my body creme I sent it to BioScreen Testing Services, Inc. They are a certified USP (United States Pharmacopeia)testing company which provides Preservative Effectiveness Validation Tests. They introduced mold, yeast, and several types of bacteria to my body creme and tested it after 14 days and again in 30 days to see if my natural preservative was able to prevent the growth of those introduced organisms and reduce them effectively to meet the USP criteria of acceptance for the Antimicrobial Effectiveness Test.
The USP testing cost me $900.00 and I thought to myself, if my body creme doesn't pass this test there goes $900.00 down the drain! I waited for 6 or 7 weeks before I received the results and I was elated to find my body creme passed the USP testing with flying colors! I called BioScreen and spoke to the manager to review the report they sent me so I understood it fully. After all it came from a lab and I wasn't familiar with all the scientific vernacular. I was told that my natural preservative held up to their challenge testing and that I have a wonderful natural product. I was also told that a lot of products that have chemical preservatives actually fail this challenge testing. I was literally jumping up and down in excitement!! So, to those that say you have to use a chemical preservative I beg to differ and I have the documents to prove it!
So, I will get off of my soap box for now, no pun intended! Below are some pictures that show the steps I went through today to make Citrus Body Creme.
I don't need to wear protective eye ware or face mask to make body creme as there are no caustic chemicals used to make body creme. I gather all my oils and additives, equipment, and jars before I start anything.
I sterilize my jars that I will use to pour the body creme into. I have tried using pump containers but my body creme is too thick and clogs the pump. I like thick cremes so I chose not to thin the creme down but to use jars instead.
I use a Stand Mixer to mix my oils and water together. I use one pot for the water mixture and a second pot for the beeswax and oil mixture.
I measure out the beeswax first.
I then measure the amount of distilled water I will need.
I put the measured beeswax into the pot I will add the vegetable oils to. I pour the distilled water into another pot. I put the heat on under the pot with the distilled water so it can come to a boil.
I measure the amount of Olive Oil I need for my body creme and then add the oil to the pot with the beeswax.
Here I measure the amount of Borax needed. Borax (Sodium Borate) is a white crystalline mineral that is used as an emulsifier. An emulsifier binds the oil and water together to make the body creme.
I add the Borax to the pot of water. I then measure the amount of vegetable glycerin I need and add this to the pot of water with the Borax in it.
I stir the mixture in the water pot and let it simmer at a consistent temperature. I then add the remaining vegetable oils to the pot with the beeswax and olive oil.
Once the oil and water mixtures are both at 165 degrees I can then combine them. I turn the stand mixer on low and slowly pour the hot oil mixture into the bowl.
I then slowly add the water mixture into the bowl that already contains the oils.
I keep the stand mixer on a low setting to prevent splashing. Occasionally I need to scrape down the sides of the bowl. As the mixture thickens I can then turn the mixer up to a higher speed. This is necessary so the oils and water come together and no longer separate.
When the mixing bowl is still warm to the touch I then add my citrus essential oil blend.
After the essential oils are added to the mixture I turn the mixer up higher so the essential oils incorporate with the body creme. This whole process of mixing the water and oils together takes about 25 to 30 minutes. I test the outside of the mixing bowl to see if it is now cool to the touch. You can see how the mixture has become thicker and is now a white color.
I can then pour some of the mixture into a measuring cup and fill my jars.
I weigh each jar as I am filling it to be consistent so that the Net Weight information on the labels matches the amount of product in the jars.
The finished product!!
My website shows a picture of my body creme in a plastic jar. I started using these recycled glass jars for my retail locations. I like the fact that the glass jars are made from recycled glass and customers can bring the empty jar back to the retail location and receive $1.00 off their next purchase. I can then sterilize and reuse the glass jars with new lids.
If you haven't tried my body creme you may want to think about trying it. It is thick and luscious and has no artificial ingredients. I believe it is pure perfection!!
Relax. Luxuriate. Enjoy.
Coleen
Tuesday, July 27, 2010
Saturday, July 17, 2010
Making Liquid Soap
The process of making liquid soap is quite different than making bar soap. I have been working on this process for a while. The first time I made liquid soap I made it too thin and when using it there were problems with it squirting out into your eye, or your shirt. That was no good! Then I tried again and used less water to incorporate into the soap paste. This time it was too thick! So it would harden in the container at some point and you would have to add more water in the container to loosen it up again. I have made liquid soap now about 15 times and I think I have finally come up with the consistency I want. My testers have given me a thumbs up so I hope to have liquid soap on my website at some point. Hopefully sooner rather than later!
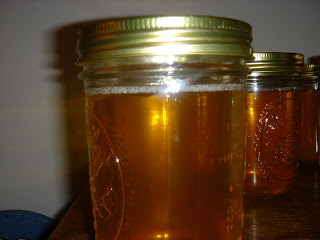
So, if you are interested in the steps for making liquid soap I have them outlined below. I do not add any artificial colors to my liquid soap, so regardless of the scent, the soap is naturally a golden color. Adding herbs or botanicals for color would just clog up the pumping action so leaving it natural is my choice.
Safety First!
Gathering Tools
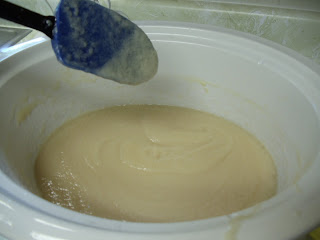
I use a crock pot to make my liquid soap in. It is much easier than using a double boiler!
Oils and Lye
I use Olive Oil, Coconut Oil, Castor Oil, Jojoba Oil, and Vegetable Glycerin.
Mixing the Lye Solution
When making Liquid Soap the Lye Solution is made using Potassium Hydroxide and Distilled Water. Measuring the Potassium Hydroxide first to then add to the Distilled Water.
Adding the Potassium Hydroxide to the Distilled Water
Measuring the Oils
After the Lye Solution is mixed I leave it alone until I get my oils measured.
Adding Oils to Crock Pot
I combine all the oils in the crock pot and set it on low so the oils melt gently.
Adding the Lye Solution to the melted oils
Once the oils have melted I then slowly add the lye solution to the crock pot.
Mixing the oils with the lye solution
Now comes the tedious part of this process. Using a stick blender I blend the oils and lye together until the mixture gets a good trace. The trace consistency for Liquid Soap is a bit thicker like a pudding consistency.
Reaching the Trace stage
Cooking the Soap Mixture
Now the soap needs to cook for 3 to 4 hours. The mixture must be stirred every 30 minutes or so. The mixture goes through multiple stages during the cooking time. The final stage of the cooking process produces a translucent vaseline type of consistency.
Diluting the soap mixture
Now is the tricky part of getting the soap mixture to blend with enough distilled water to get to the consistency for the final product. This is where I have goofed up a few times. I either added too much Distilled Water or not enough Distilled Water at this stage. I think I have finally found the correct measurements that I like for liquid soap. I boil the amount of Distilled Water I want to add to the soap paste first, then I add it to the crock pot and mix it around to combine the water and soap paste.
Waiting for complete dilution
Now it will take some time for the paste to completely incorporate with the water. I unplug the crock pot and normally leave it sit until the next morning.
The Final Steps
The next morning I usually have to take a potato masher to the remaining chunks of paste that didn't incorporate fully with the water. I turn the crock pot back on low and keep mashing these little chunks until they are all gone and everything in the crock pot is now incorporated fully. I then add a few tablespoons of a mixture of borax and water to neutralize the liquid soap to remove any excess lye in the mixture. Next I add vegetable glycerin for extra emolliency, then I add the essential oil for whatever fragrance I desire. I then unplug the crock pot and let the liquid soap cool. Once cool, I then pour the liquid soap into jars and let them rest for two weeks.
After two weeks I can then pour the liquid soap into soap dispensers. So, the process of making liquid soap is labor intensive but it is well worth the work to get a natural product that does not have any detergents or artificial ingredients added to it. Commercially made liquid soaps are most often detergents and leave the skin dry. Naturally handmade liquid soap will gently cleanse your skin and keep it soft and healthy.
Those are my thoughts for today!
Relax. Enjoy. Luxuriate.
Coleen
Saturday, June 26, 2010
Shapes Salon and Studio
I will be at Shapes Salon and Studio http://www.shapessalonandstudio.com today, Saturday June 26,2010. Orders can always be processed via my website http://www.sudsations.com. Since I don't have a storefront, you can visit Shapes Salon and Studio to check out my handmade soap, body creme, lotion bars, gift sets, and liquid foaming soap. Hope to see you there!
Relax. Luxuriate. Enjoy.
Coleen
Relax. Luxuriate. Enjoy.
Coleen
Monday, June 21, 2010
Sudsations visit to Shapes Salon and Studio
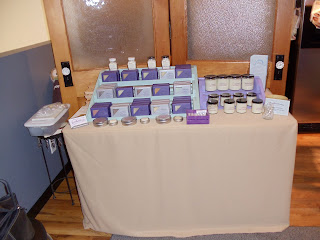
Sudsations products are available at Shapes Salon and Studio http://www.shapessalonandstudio.com/ in downtown Denver. I visited the salon on June 12, 2010 and set up a display table. This allowed customers to test my Body Creme and Lotion Bars. We also had a chance to talk about the benefits of handmade bath and body products. Sudsations products are made with pure vegetable oils, essential oils, and botanicals. I use a few fragrance oils when an essential oil is not available for a certain fragrance. I do not use any parabens or chemicals in any of my products.
DISPLAY TABLE
I enjoyed talking with customers so I could answer their specific questions about my products. Most often, just trying my Body Creme is enough for someone to understand how wonderful it feels on the skin.
HANDMADE SOAP, MILK BATH, LOTION BARS
HANDMADE BODY CREME AND LIP BALM
GIFT BASKETS
PROPRIETOR, COLEEN VERALDO
I will be at Shapes Salon and Studio again on Saturday June 26, 2010 from 10:00am - 3:00pm. Please stop by to test some of my products, or just to say hello!!
Relax. Luxuriate. Enjoy.
Coleen
Wednesday, June 2, 2010
The process of making Cold Process Handmade Soap
Sudsations utilizes the Cold Process Method of soap-making, which relies almost exclusively on the heat generated by the chemical reaction of fatty acids from vegetable oils and alkali, or lye, to produce soap. This process is known as saponification. No external heat is applied once the ingredients have been mixed. Because of this process, there is no free lye remaining in the finished soap.
The benefit of saponification, and handmade soap in general, is all natural glycerin remains in the finished product, unlike mass-produced soap. Glycerin is a natural humectant, emulsifier, and skin-softener.
1. Gathering all products needed for soap making before starting the process.
2. Donning proper safety attire.
3. Mixing the Sodium Hydroxide with Distilled Water to create the Lye Mixture.
4. Adding purple herb blend to the lye mixture for color.
5. Weighing out all the necessary oils.
6. Melting the oils.
7. Once the oils are melted they can then be mixed with the Lye solution.
8. Adding the lye solution to the melted oils.
9. Using a stick blender to mix the lye and oil until trace is achieved. Trace is achieved when some of the mixture is dribbled on top and leaves a 'trace' on top of the mixture where the dribbled amounts landed. Once the soap mixture has reached trace any essential oils or fragrance can be added for scent. Herbs or botanicals can also be added for additional color or texture.
10. The soap mixture is then poured into a soap mold.
11. After 24 hours the soap is unmolded.
12. The soap can then be cut into individual bars in another day or two after the initial unmolding.
13. The finished product must then cure for 4 weeks. After the final curing there is no free lye left in the finished soap. What is left in the final bars of soap is the natural glycerin produced during the soap making process. Commercially made soap has the natural glycerin removed, which is then sold separately for use in other products.
The process of making handmade soap is labor intensive. The benefits of handmade soap are tremendous, and worth the extra cost compared to a commercially made bar of soap. Supporting reputable handmade soap makers is a good thing!
Relax. Luxuriate. Enjoy.
Coleen
Wednesday, May 19, 2010
Heads Up
Heads UP is my new 100% natural handmade soap. A fragrant blend of Lavender, Eucalyptus, and Tea Tree essential oils with a swirl of purple color using an herbal blend. All these essential oils are calming and healing along with the extra bonus of Eucalyptus to help open stuffy noses!
I came up with this essential oil blend because my daughter gets a stuffy nose during seasonal changes. Her allergies act up and she wanted me to make a soap with Eucalyptus essential oil to help clear her stuffy nose. I chose to include Lavender and Tea Tree essential oils to create a lovely aromatic blend.
Lavender Essential Oil has calming properties. Lavender Essential Oil also has healing and antibacterial properties. It calms and soothes the skin, but it also has emotional benefits. Lavender Essential Oil is said to clear thinking and strengthen the nervous system.
Tea Tree Essential Oil also has healing and antibacterial properties. Tea Tree Essential Oil is effective in the treatment of skin disorders such as acne. It cleanses and disinfects wounds and soothes and heals burns.
Eucalyptus Essential Oil eases nasal congestion and cold symptoms. It also has healing and antibacterial properties to hasten the healing of cold sores. Eucalyptus Essential oil can improve concentration and restore emotional balance.
Try this new soap and I promise you won't be disappointed!
I don't have this new soap on my website yet, but if you are interested in purchasing a bar please email me at sudsations@comcast.net or visit my Etsy shop at
http://www.etsy.com/shop/SudsationsLLC
Relax. Luxuriate. Ejoy.
Coleen
Subscribe to:
Posts (Atom)